Getting Started with Auditing (deprecated)
The sections in this topic provide an example of how to configure secure file auditing in a Windows environment. You can use a similar process to configure auditing in a UNIX environment.
1. Create a configuration file
In this section, you create the configuration file that the audit process is to use. The configuration file controls the audit process: sets up the location, number, and maximum size of the files that the Audit Manager creates.
The lines beginning with the # character are comments only.
- Create a folder to hold your configuration file and auditing logs, for example: C:\MFAudit
- In the directory you created, use a text editor to create the
audit.cfg file, and add the following content. The lines starting with
# are comments only:
mfaudit.dest=AUDITFILE
# Sets the output type to secure file.
mfaudit.emitter.auditfile#collectionsize=3
# Sets that the audit process uses three files only.
mfaudit.emitter.auditfile#location=C:\MFAudit\logs
# Sets the location where the files are to be created.
mfaudit.emitter.auditfile#file= audit.aud_$(GEN)
# Sets the auditing file names. The $(GEN) parameter
# sets that the filenames are numbered sequentially.
mfaudit.emitter.auditfile#maxfilesize=200
# Sets that audit files are closed when they reach
# a size of 200 KB
2. Start the auditing service
In this section, you re-start the auditing service so that it uses the configuration file.
- In Windows Services, locate the Micro Focus Audit Manager service, and if it is started, stop it.
- Right-click the service, and select Properties.
- Select the
General tab, and in the
Start parameters field at the bottom of the dialog box, enter the following:
-c C:\MFAudit\audit.cfg
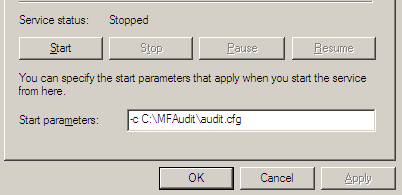
- On the dialog box, click Start and check that the service starts without errors.
- In Windows Explorer, check that the log files have been created ready for use.

3. Configure an External Security Manager (ESM)
In this section, you configure the Operating System ESM so that it is available for use.
- Start an Enterprise Server Administration session, and in the left hand pane under
Configure, select
Security.
The Security Options screen appears.
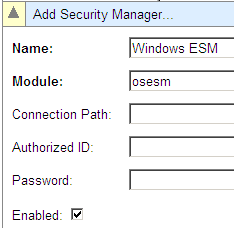
- Select the Security Managers tab, and click Add to display the Add Security Manager screen.
- In the
Name field, enter a name, for example
Windows ESM, and in the
Module field, enter
osesm to specify the security manager. Ensure that the
Enabled checkbox is checked, and click
Add to add the security manager.
4. Generate MFDS auditing events
In this section, you configure the Operating System External Security Manager (ESM) to generate auditing events for Micro Focus Directory Server.
- In the left hand pane, select Security.
- Select the MF Directory Server tab and at the bottom of the screen, and click the Change button.
- Select the radio button next to the Windows ESM item you created, and click Add. You are prompted for a login with MF directory server administration permissions.
- Enter a valid Enterprise Server Administration user ID, for example the default SYSAD, password SYSAD, and click OK. You are prompted for a user ID and password with Administer Users permissions. Enter your system login and click OK.
- Under the
MF Directory Server tab, in the
Security Facility Configuration area, select the
Create audit events checkbox, and at the bottom of the screen, click
Apply.

MFDS operations that are performed are now logged to the audit files.
5. Generate Enterprise Server audit events
In this stage, you configure the Audit Manager to collect records of events generated by Enterprise Servers that are running.
- In the left hand pane, select Security.
- Select the Default ES Security tab and under Default ES Security Manager List, click Add.
- Select the radio button next to the Windows ESM entry, and click Add.
6. Perform secure operations
In this section, you generate audit events to be logged.
- Log off the directory server and log back on again.
- Perform some enterprise server processes, for example starting and stopping regions.
- Repeat the process to generate some audit events that you can check.
7. View the audit logs
In this section, you make the audit records accessible for viewing, and generate a report.
- In Windows Explorer, check the audit files and verify by the file size and datestamp that the first audit file has logged
the audit data.

- Open a command prompt, and navigate to the C:\MFAudit\logs folder.
- Use the following command to make the first audit file available for dumping:
mfauditadm -p -f audit.aud_1
- Use the following command to generate an audit report from the dumped file:
mfauditadm -r -o audreport.txt -f audit.aud_1
The above command creates a file named audreport.txt, that contains the audit information.