- On the 
                     			 Tools menu, click 
                     			 Custom Data Types. 
                     			 
                     The 
                        				Custom Data Types tab is displayed. 
                        			 
                      
- To define a new data type, click 
                     			 New. 
                     			 
                     The 
                        				Custom Data Type dialog box is displayed. 


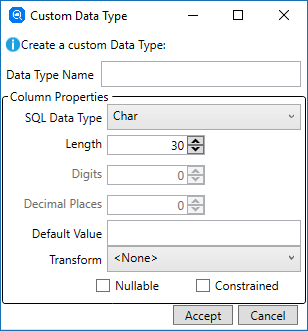
- In the 
                     			 Data Type Name field, type a descriptive name for this user data type. 
                     		  
                  
- In the 
                     			 SQL Data Type field, click 
                     			 Char and select the required data type. 
                     		  
                  
- Depending on the data type selected, complete the following options when enabled: 


                        - Length - the maximum number of characters for the length of the column value. 
                           				
                        
- Digits - the number of decimal digits in the column value. 
                           				
                        
- Decimal Places - the number of decimal digits to the right of the decimal point in the column value. 


- If required, in the 
                     			 Default Value field, specify the default column value. 
                     			 
                     The default value is used for columns of this type when, for example, a column value is not specified in an SQL INSERT statement.


- In the 
                     			 Transform field, click 
                     			 <None> and select the required transform. 
                     			 
                     The value 
                        				<None> indicates that no column transform is desired, but an item transform may be associated with the data item upon which columns
                        of this user data type are based. 
                        			 
                      
- Select the 
                     			 Nullable tick-box if the user data type allows the column to be set to null. 
                     		  
                  
- Select the 
                     			 Constrained tick-box if the user data type constrains the column value to one of the true values of an 88-level condition-name associated
                     with the data item upon which the column is based. 
                     		  
                  
- Click 
                     			 Accept to add the new user data type. 
                     		  
                  
- Click 
                     			 Save to Catalog. 
                     		  
                  
Note: To edit an existing data type, double-click the data type, edit the details as necessary, then click 
                  		  Accept. To delete an existing data type, right-click the entry on the 
                  		  Custom Data Types tab and click 
                  		  Delete. (Note that you can only delete a user type that is unused.)